Kubernetes architecture And Workflow
When you deploy Kubernetes, you get a cluster.
A Kubernetes cluster consists of a set of worker machines, called nodes, that run containerized applications. Every cluster has at least one worker node.
The worker node(s) host the Pods that are the components of the application workload. The control plane manages the worker nodes and the Pods in the cluster.
Control Plane /Master contains:-
The kube-api server
validates,configures data for api objevts like pods , services , replication controllers etc .as name suggests it manages all api resources of kubernetes
The API server is the front end for the Kubernetes control plane.
etcd:
its basically db of kubernetes where it stores all info like how many pods are up and running , how many it hsould be up and running etc
kube-scheduler:
schedules all pods on different nodes and manages it
controller manager:-
manages different controllers present in kubernetes
Node controller: Responsible for noticing and responding when nodes go down. ServiceAccount controller: Create default ServiceAccounts for new namespaces
kubelet and kube proxy are present on all worker nodes
Kubelet
is responsible for managing the deployment of pods to kubernetes nodes .It receives commands from kube api server and instructs the container run time like docker to start and stop containers as needed.
The kubelet takes a set of PodSpecs that are provided through various mechanisms and ensures that the containers described in those PodSpecs are running and healthy
Kube proxy
is present on each node in your kubernetes cluster.It maintains network rules on your nodes and enables network communication to your pods.
kube-proxy maintains network rules on nodes. These network rules allow network communication to your Pods from network sessions inside or outside of your cluster.
Container runtime
The container runtime is the software that is responsible for running containers.
Container network interface :
responsible for maintaining pod to pod communications where pods are deployed across the cluster in different worker noded
Kubernetes Workflow for Absolute Beginners
Hello Everyone, let’s discuss the kubernetes workflow. Whenever we are executing any command let’s say “kubectl create pod nginx”, how the pod request work in the backend and how a pod is got created:
The request is authenticated first and validated.
The “kube-api-server” creates a POD object, without assigning it to a node, updates the information of the newly created pod in “ETCD Cluster” and updated/shows us a message that a POD is got created.
The “kube-scheduler” which is continually monitoring the “kube-api-server” gets to know that a new pod is got created with no node assigned to it.
The “kube-scheduler” identifies the right node (according to pod resource requirement, pod/node affinity rules, labels & selectors etc.) to place the new POD and communicate back to the “kube-api-server” (with the information of the right node for the pod)
The “kube-api-server” again updates the information to the “ETCD Cluster” received from “kube-scheduler”.
The “kube-api-server” then passed the same information to the “kubelet” on the appropriate worker node identified by “kube-scheduler” in the 4th step.
The “kubelet” then creates the pod on node and instructs the “Container Runtime Engine” to deploy the application image/container.
Once done, the “kubelet” updates the information/status of the pod back to the “kube-api-server”.
And “kube-api-server” updates the information/data back in the “ETCD Cluster”.
Concept of Admission Controllers
Admission controllers determine if the request is well-formed and approve or reject the API request.
Why use Admission Controllers
Admission controllers are a key component of the Kubernetes request lifecycle. They offer several advantages
Admission controllers evaluate requests and enforce fine-grained rules. RBAC based authentication and authorization controls operate on identities and actions. Admission controllers offer controls at the object and namespace level.
Admission controllers can be used to inject sidecars into pods dynamically. These sidecars can be used for logging, secrets management, providing service mesh capabilities etc.
Admission controllers can be used to validate configuration and prevent configuration drift. This helps in preventing resource misconfiguration and resource management.
Admission controllers enable policy-based security rules. It can be used to disallow containers from running with root privileges, prevent containers from pulling images from unauthorized sources etc.
The list of built-in admission controllers is in the Kubernetes
AlwaysPullImages
This admission controller modifies every new Pod to force the image pull policy to Always.
This is useful in a multitenant cluster so that users can be assured that their private images can only be used by those who have the credentials to pull them.
Without this admission controller, once an image has been pulled to a node, any pod from any user can use it by knowing the image's name
When this admission controller is enabled, images are always pulled prior to starting containers, which means valid credentials are required.
CertificateApproval
This admission controller observes requests to approve CertificateSigningRequest resources and performs additional authorization checks to ensure the approving user has permission to approve certificate requests with the spec.signerName requested on the CertificateSigningRequest resource.
LimitRanger
This admission controller will observe the incoming request and ensure that it does not violate any of the constraints enumerated in the LimitRange object in a Namespace
apiVersion: v1
kind: LimitRange
metadata:
  name: mem-limit-range
spec:
  limits:
  - max:
      memory: 512Mi
    min:
      memory: 256Mi
    type: Container
We can apply this limit to a specific namespace
kubectl create namespace default-mem-example namespace/default-mem-example created
kubectl apply -f memory-default.yaml --namespace=default-mem-example limitrange/mem-limit-range created
If we now, try to create a pod with memory size of more than the maximum limit or less than the minimum limit the request will be rejected. Let us try this by creating a pod definition as below
apiVersion: v1
kind: Pod
metadata:
  name: default-mem-demo-2
spec:
  containers:
  - name: default-mem-demo-2-ctr
    image: nginx
    resources:
      limits:
        memory: "2Gi"
The above pod definition tries to create a pod with a memory request size of 2 GB which is above the maximum limits specified. If we try and create this pod , the LimitRanges admission controller will validate the request and reject it as below
> kubectl apply -f memory-default-2gi.yaml --namespace=default-mem-example
Error from server (Forbidden): error when creating "memory-default-2gi.yaml": pods"default-mem-demo-2" is forbidden: maximum memory usage per Container is 512Mi, but limit is 2Gi
As expected, the LimitRanges admission controller prevented the creation of this pod as its memory requirements violated the memory limits set for the namespace.
CertificateSigning
This admission controller observes updates to the status.certificate field of CertificateSigningRequest resources and performs an additional authorization checks to ensure the signing user has permission to sign certificate requests with the spec.signerName requested on the CertificateSigningRequest resource.
DefaultIngressClass
This admission controller observes creation of Ingress objects that do not request any specific ingress class and automatically adds a default ingress class to them.
This admission controller does not do anything when no default ingress class is configured
DefaultStorageClass
This admission controller observes creation of PersistentVolumeClaim objects that do not request any specific storage class and automatically adds a default storage class to them.
This admission controller does not do anything when no default storage class is configured. When more than one storage class is marked as default, it rejects any creation of PersistentVolumeClaim with an error and an administrator must revisit their StorageClass objects and mark only one as default.
Custom Resource definitions:-
It's a way to add new type of resources and enhance the capabilities of kubernetes.
if i want to add advanced load balancer capabilities using f5 load balancer
by default Kubernetes does not support f5 load balancer (which can be used for complex loabalnacing)
kubernetes only supports few , it cant support multiple thrid party applications
to solve this problem and not to include hundreds of such resources , Kubernetes came up with a concept called CRD.
So, these external resources like f5 load balancers which are not supported, can write their own CRD (ie, nothing but creating a new type of API to Kubernetes)and create custom controller
You should already deploy a Custom controller in ur Kubernetes cluster and when u deploy a Custom resource, this custom controller will check and implements it in ur cluster
ServiceMesh Concept:
Resource:- Please refer https://dev.to/techworld_with_nana/step-by-step-guide-to-install-istio-service-mesh-in-kubernetes-d6d
https://www.youtube.com/watch?v=voAyroDb6xk
A Service Mesh is a configurable infrastructure layer that makes communication between microservice applications possible, structured, and observable.
It ensures that communication across containers or pods is secure, fast, and encrypted.

Istio would inject envoy proxy in each of those micro
service Pods.
No we explicitly need to tell Istio to inject the proxies into every Pod that starts in the cluster, since it doesn't inject proxies by default.
The configuration is actually very simple. We just need to label a namespace in which the pods are running with a label called "istio-injection=enabled" like this:
kubectl label namespace default istio-injection=enabled
To see the proxies being injected, you will need to restart the microservice Pods. You can do that by deleting the pods and then re-applying the Kubernetes manifests yaml file.
Now we have the Istio component running in a cluster that automatically injects the envoy proxy container into every Pod that we create in a default namespace.
Use case of Istio:
One of the glaring challenges of deploying microservices to Kubernetes is figuring out optimal and secure network communication from outside the cluster to your services inside of it and network communication between the services themselves.
In some scenarios, we can use Kubernetes services like LoadBalancers and NodePorts to expose our applications to the world. However, there are use cases where this isn't the best approach.
A better and safer practice is establishing a single point of entry into your cluster that can also manage HTTP traffic and smart routing.
Istio is an open-source implementation of a service mesh and is an agnostic middleware solution that handles network communication for your applications.
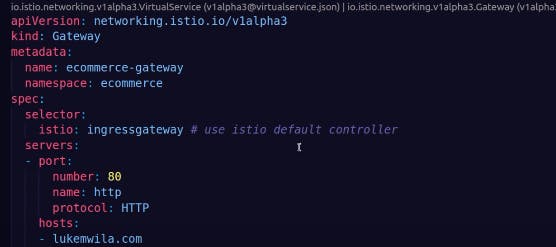
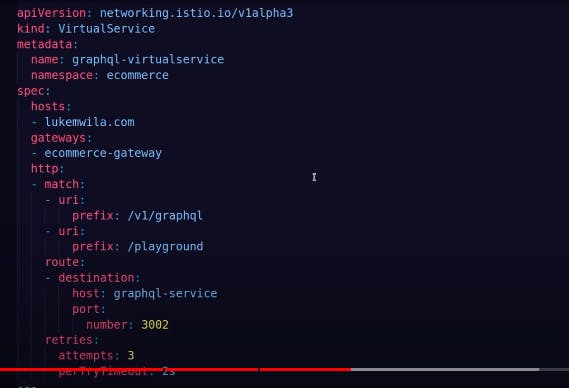
You can use Istio gateways and virtual services to open a doorway to the microservices in your cluster and securely route that traffic to the relevant destination services.
Gateway and virtual service tells us what traffic to be routed and how

we are opening port 80 http traffic to route to hosts lukemwila.com(address used by client to connect to my microservices)
virtual service

it tells us traffic routing, how to interact with services
Controllers concept:-
controller manages state of Kubernetes objects
replication controller-> maintains state of replicas , of pods
custom kubernetes controller:-
nginx
argocd
istio
crd is designed by third party like istio , f5 to include their services in kubernetes, so now its upto users to create custom resource and now controller will act upon it to perform specific action and manage the state of that custom resource
Kubernetes operator:
Operators Bundle, package and manage Kubernetes controllers
generally these custom controllers like istio , f5, nginx, promethhues etc can be installed via helm, its also a package manager, but why do we need operators then ?
Difference between Helm and operators
For example u can install Istio using helm or operators
via helm u can have chart.yaml , values.yaml , depl.yaml,svc.yaml,cm.yaml etc
and we can deploy istio using this by overriting values.yaml
reconciliation:-
if someone updates any port /svc or anything in the Kubernetes cluster , helm does not have control to overwrite or modify it, it cannot do anythng (This is called reconciliation)
Operators can reconcile
Automatic upgrades
using 1 single operator u can install controllers in hundred namespaces , ucan install istio many times
Provides insights like who is using kuberenetes controller, how many have installed kubernetes operator ,are there any issues etc
operator framework :
go based operator
ansible based operators
helm based operators
better one is go based operators
few operators in use are :
prometheus
elastic search
istio
argocd
Distroless" Container Images.
"Distroless" images contain only your application and its runtime dependencies. They do not contain package managers, shells or any other programs you would expect to find in a standard Linux distribution.
